Central Authorization of Clients Towards Cameras
In the centralized authorization model, clients are granted access to devices by a central service controlled by the vendor. Access control is then enforced by the Nabto WebRTC Signaling Service. Devices accept connections from any client that has been centrally authorized in this way.
Only clients authorized for a specific device can establish signaling channels and exchange messages. Because devices themselves are authenticated with the Nabto WebRTC Signaling Service, clients can trust that they are communicating with the correct, authorized device.
Since this access control is enforced by the Nabto WebRTC Signaling Service, it will be a trusted component. A decentralized model like the shared secret model will not have this limitation.
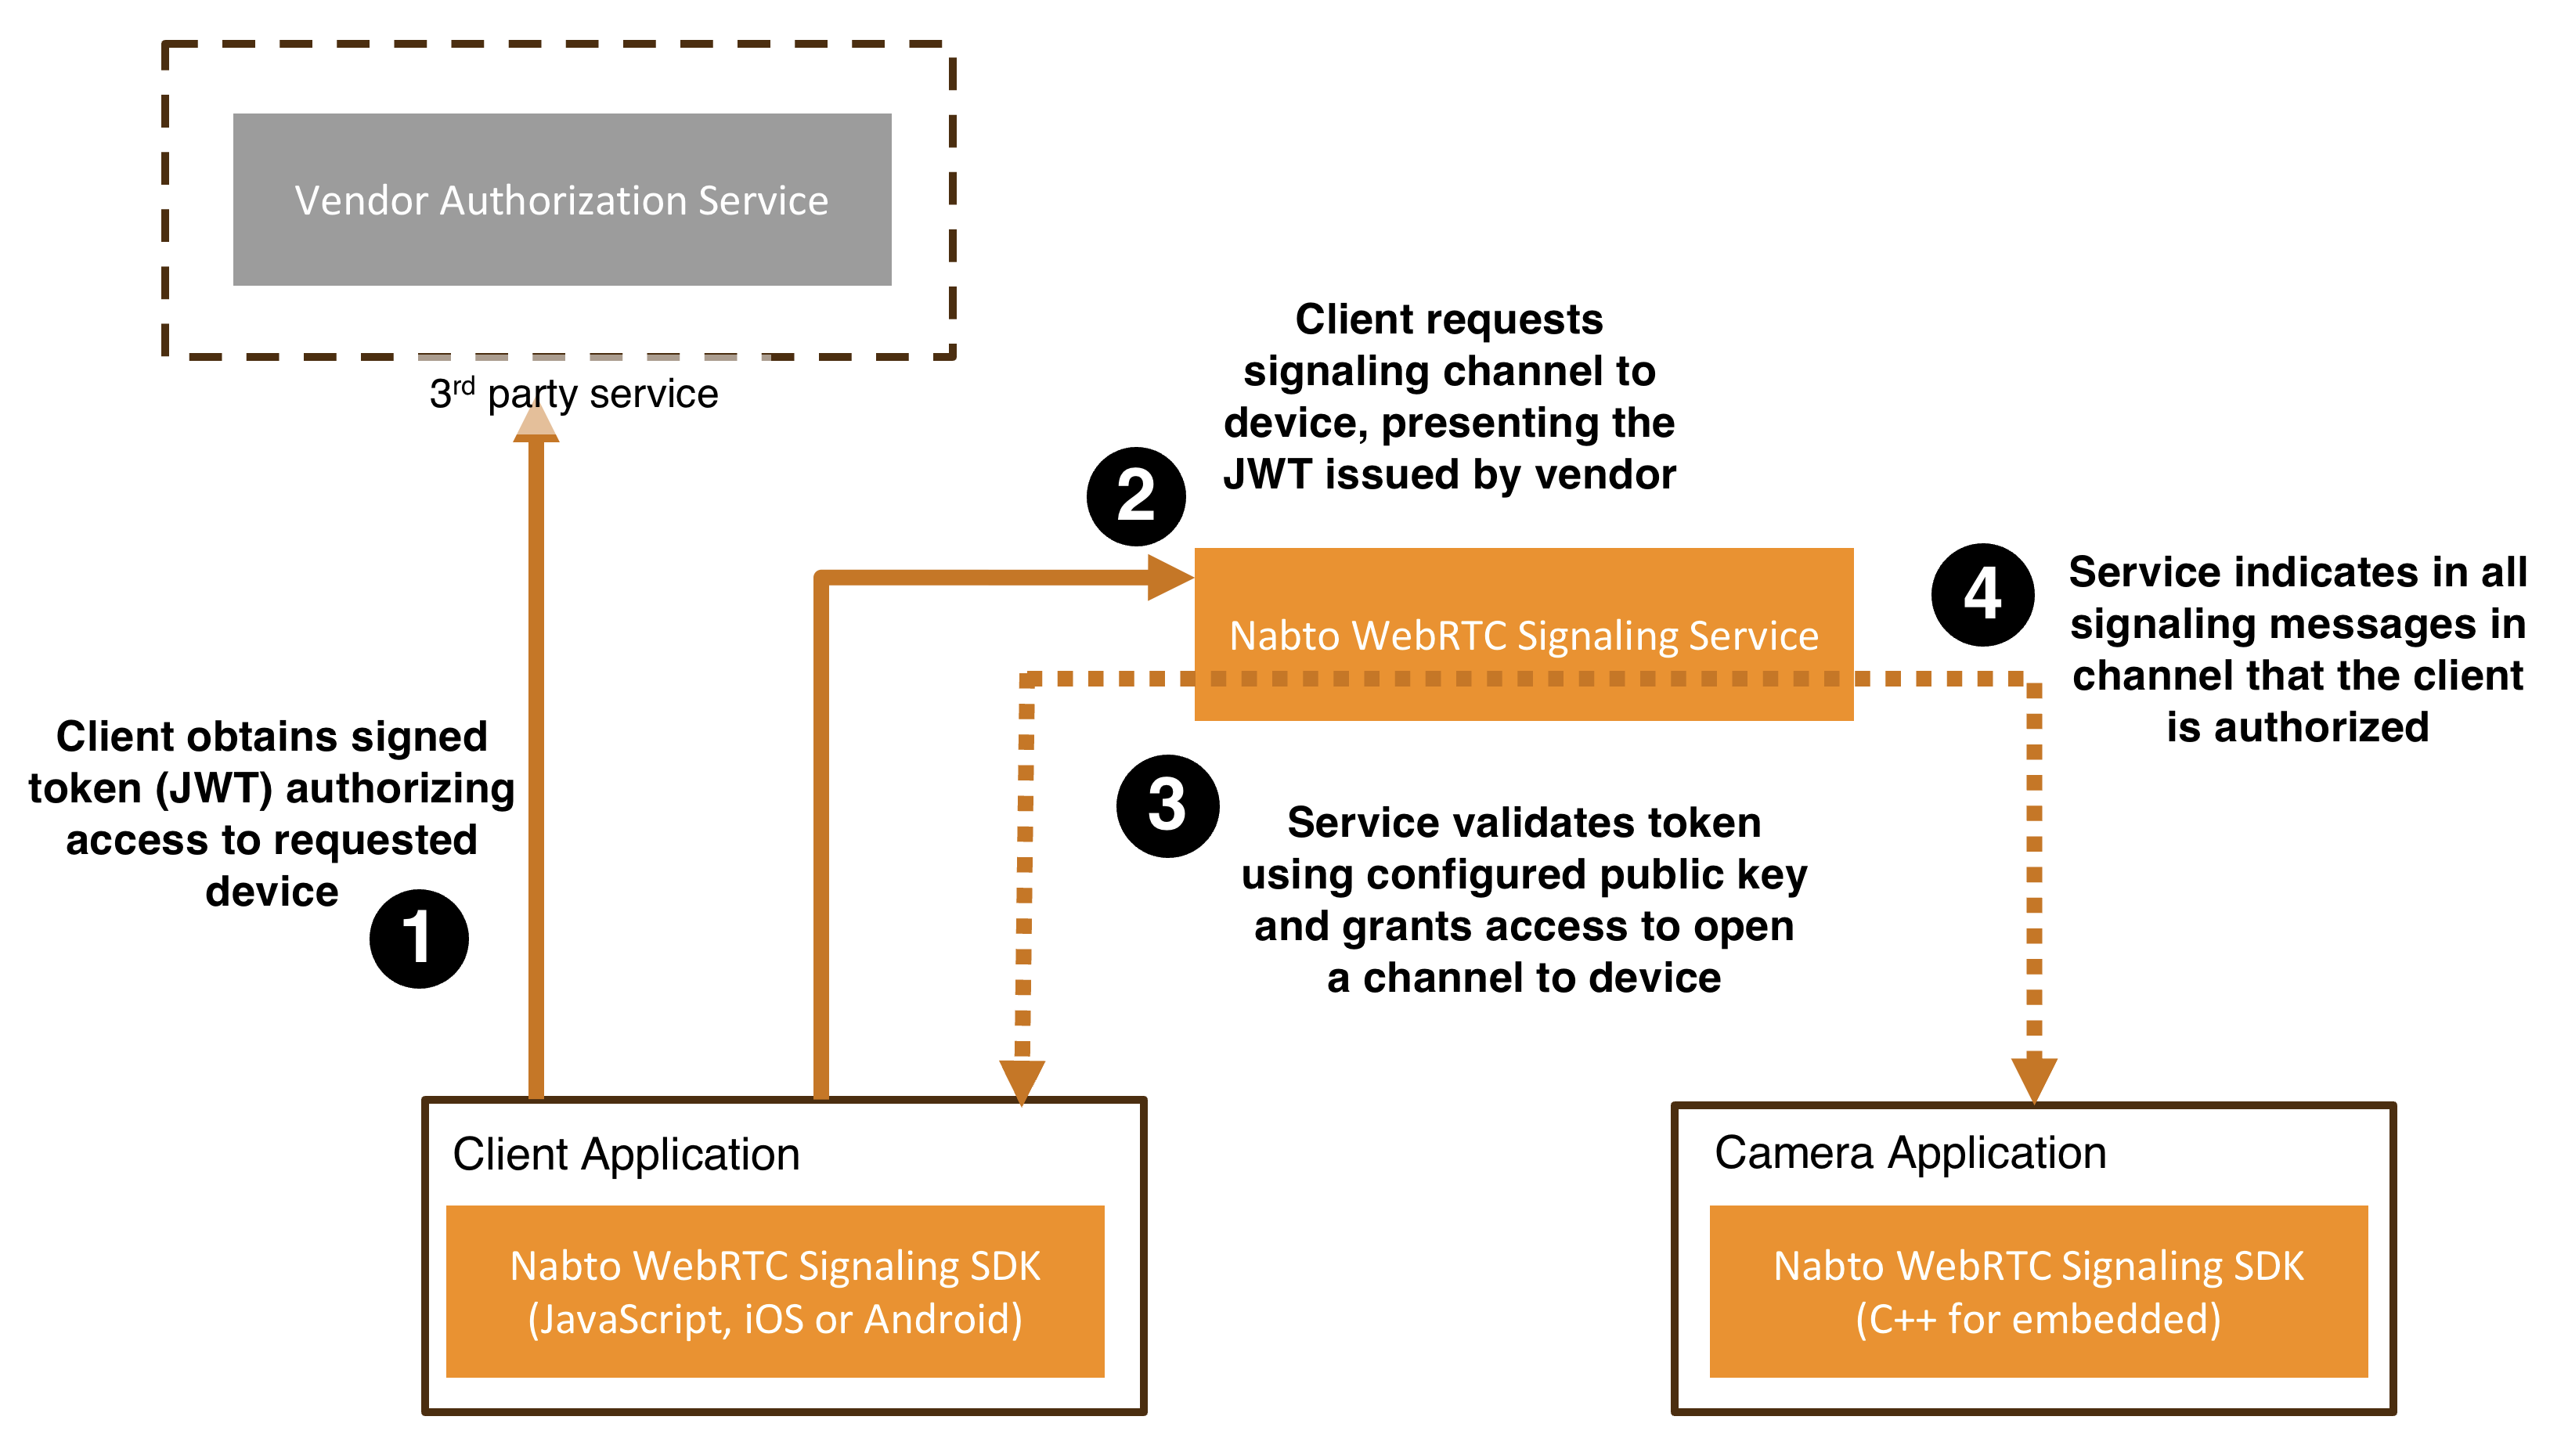
1. Client obtains signed token (JWT) authorizing access to requested device
Before a client can open a signaling channel to a device, it must obtain a signed token (JWT) from a vendor-controlled authorization service. This token confirms that the client is allowed to access the specific device it is requesting. The vendor’s authorization service maintains knowledge of which clients have access rights to which devices and issues tokens accordingly.
Nabto WebRTC does not impose any requirements on how the vendor authenticates and authorizes the client; the vendor can use any preferred mechanism to authenticate the client. And to authorize the client’s access to the requested device.
The only requirement are some specific fields (claims) to be present in the resulting JWT passed on to the Nabto WebRTC Signaling Service, for instance the device ID for which the client is authorized. See details about the token structure below. And that the JWT is signed with a private key for which the corresponding public key is configured in the vendor’s solution (see step 3).
2. Client requests signaling channel to device, presenting the JWT issued by vendor
Once the client holds the access token, it connects to the Nabto WebRTC Signaling Service and requests to open a signaling channel to the target device. The client presents the token as part of this request. The Nabto WebRTC SDKs all take care of this as seen in the client application example snippets below.
3. Nabto WebRTC Signaling Service validates token using configured public key and grants access to open a channel to device
The Nabto WebRTC Signaling Service verifies the token’s signature using the vendor’s configured public key. If the token is valid and confirms that the client has access rights to the requested device, the service allows the channel to be established.
4. Nabto WebRTC Signaling Service indicates in all signaling messages in channel that the client is authorized
All signaling messages exchanged on the established channel are flagged by the signaling service as being authorized (for use by the SDKs, the application is not aware of this). This mechanism is used to ensure that only authorized clients can exchange signaling messages with the device.
Implementation
Authorization token structure
For clients to be authorized by the Nabto WebRTC Signaling Service, it must provide a Bearer token in the Authorization header of its HTTP requests. This token must be signed with a private key and its corresponding public key must be registered in our backend. The token must be a JWT of the following format:
{
  alg: "ES256",
  kid: "<KEY_ID>"
}
{
  scope: "<SCOPES>",
  resource: "urn:nabto:webrtc:<PRODUCT_ID>:<DEVICE_ID>",
  iat: 1737641325,
  exp: 1737727725
}
The placeholders in the above mean the following:
KEY_ID: The ID assigned to the public key when registered in the Nabto Cloud Console.SCOPES: List of strings separated by spaces. The two valuesclient:connectandturnare supported. They will allow the client to connect to the device and access Nabto TURN servers, respectively.PRODUCT_ID: The product ID created in the Nabto Cloud Console.DEVICE_ID: The ID of the device the token gives access to created in the Nabto Cloud Console.
A sample service for generating such tokens is shown in the next section.
Sample service for generating a token for Central Authorization
This is a simple example of a Node.js Express service that can issue tokens with the specified format:
app.post('/token', authorizeForDevice, async (req, res) => {
    const { productId, deviceId, scope = 'client:connect turn' } = req.body;

    if (!productId || !deviceId) {
        return res.status(400).json({ error: 'Missing required parameters' });
    }

    try {
        const resource = `urn:nabto:webrtc:${productId}:${deviceId}`;
        const jwt = await new jose.SignJWT({ scope, resource })
            .setIssuedAt()
            .setExpirationTime('1 day')
            .setProtectedHeader({ alg: 'ES256', getPrivateKeyId() })
            .sign(getPrivateKey());
        return res.json({ token: jwt });
    } catch (err) {
        console.error(err);
        res.status(500).json({ error: 'Failed to generate token' });
    }
});
The authorizeForDevice() function first authenticates the user, e.g. by validating an OAuth2 Bearer token provided in the HTTP request and extracts a user ID. It then looks up if this user has been granted access to the requested device, e.g. a database lookup or an invocation of an external service. If successful, the new JWT token is issued.
Client implementation
Client code using central authorization looks as follows:
import WebRTC
import NabtoWebRTC
import NabtoWebRTCUtil

let productId = "wp-39wu7tex"
let deviceId = "wd-3xtqp3hy4xxy3av3"
let sharedSecret = "59470b3f8e331d9975da366d8dc0dcf743ef6a1154a4f779932740b4d14be3ab"

class RTCConnectionHandler {
    var signalingClient: SignalingClient? = nil
    var messageTransport: MessageTransport? = nil

    init(videoView: RTCMTLVideoView) {
        self.videoView = videoView
    }

    func connect(_ productId: String, _ deviceId: String, _ accessToken: String) async throws {
        signalingClient = createSignalingClient(
            SignalingClientOptions(
                productId: productId,
                deviceId: deviceId,
                accessToken: accessToken
            )
        )

        try await signalingClient?.start()
        messageTransport = try await createClientMessageTransport(
            client: signalingClient!,
            options: .sharedSecret(sharedSecret: sharedSecret)
        )
        await messageTransport?.addObserver(self)
    }

    private func setupPeerConnection(_ iceServers: [SignalingIceServer]) {
        let constraints = RTCMediaConstraints(mandatoryConstraints: nil, optionalConstraints: nil)
        let config = RTCConfiguration()
        config.iceServers = iceServers.map { iceServer in
            RTCIceServer(
                urlStrings: iceServer.urls,
                username: iceServer.username,
                credential: iceServer.credential
            )
        }

        peerConnection = factory.peerConnection(with: config, constraints: constraints, delegate: self)
        perfectNegotiation = PerfectNegotiation(peerConnection: peerConnection, messageTransport: messageTransport!)
    }
}

extension RTCConnectionHandler: MessageTransportObserver {
    func messageTransport(_ transport: any MessageTransport, didFinishSetup iceServers: [SignalingIceServer]) async {
        setupPeerConnection(iceServers)
    }

    // ... remaining callback implementations
}
var accessToken = ... // an access token which grants the client access to the device.
var options = SignalingClientFactory.Options()
            .setProductId(...)
            .setDeviceId(...)
            .setAccessToken(accessToken);
var client = SignalingClientFactory.createSignalingClient(signalingClientOptions);
client.start();
// The client will connect to the Nabto WebRTC Signaling Service using the provided access token.
function connectToCamera({ productId, deviceId, token }) {
  // token is issued by a vendor controlled service with claims as defined above
  const signalingClient = createSignalingClient({ productId, deviceId, accessToken: token });
  const transport = createClientMessageTransport(signalingClient, {
    securityMode: ClientMessageTransportSecurityMode.NONE,
  });

  transport.on("setupdone", (iceServers) => {
    const pc = new RTCPeerConnection({ iceServers });
    new PerfectNegotiation(pc, transport);
    new SignalingEventHandler(pc, signalingClient);
    pc.ontrack = (event) => {
      const video = document.getElementById("remote-video");
      if (video.srcObject === null) {
        video.srcObject = new MediaStream();
      }
      video.srcObject.addTrack(event.track);
    };
  });

  signalingClient.start();
}
The access token is specified to the SDK when creating the Nabto WebRTC signaling client. The security mode is set to NONE, indicating that the transport layer will not enforce any security.
Device implementation
When a centrally authorized client connects, the device will validate the connection is authorized before accepting it. Since we are relying on the central authorization, we use the None message transport which handles message encoding/decoding but does not do any signing of the messages:
function handleNewChannel(channel, authorized) {
  if (!authorized) {
      const error = new SignalingError("UNAUTHORIZED", "The device requires central authorization, but the client is not centrally authorized to access the device.");
      this.onError?.("DeviceImpl", error);
      channel.sendError(error);
      channel.close();
      return;
  }
  this.messageTransport = createDeviceMessageTransport(this.signalingDevice, channel, {
    securityMode: DeviceMessageTransportSecurityMode.NONE
  });
  this.messageTransport.on("setupdone", async (iceServers) => {
    const pc = new RTCPeerConnection({ iceServers: iceServers });
    new PerfectNegotiation(pc, this.messageTransport);
    new SignalingEventHandler(pc, this.signalingDevice);
    const stream = await navigator.mediaDevices.getUserMedia({ video: true, audio: false });
    stream.getTracks().forEach((track) => {
        pc.addTrack(track);
    })
})
  }
int handleNewChannel(SignalingDevicePtr device,
                     nabto::example::H264TrackHandler trackHandler,
                     SignalingChannelPtr channel, bool authorized) {
  if (!authorized) {
    auto authorizationErrorMessage =
        "Rejecting connection as central authorization is required";
    channel->sendError(nabto::webrtc::SignalingError(
        nabto::webrtc::SignalingErrorCode::ACCESS_DENIED,
        authorizationErrorMessage));
    channel->close();
    return;
  }
  nabto::webrtc::util::MessageTransportPtr transport =
      nabto::webrtc::util::MessageTransportFactory::createNoneTransport( device, channel);

  auto webConn = nabto::example::WebrtcConnection::create(
      device, channel, transport, trackHandler);
}