Nabto WebRTC Device (Camera) Applications
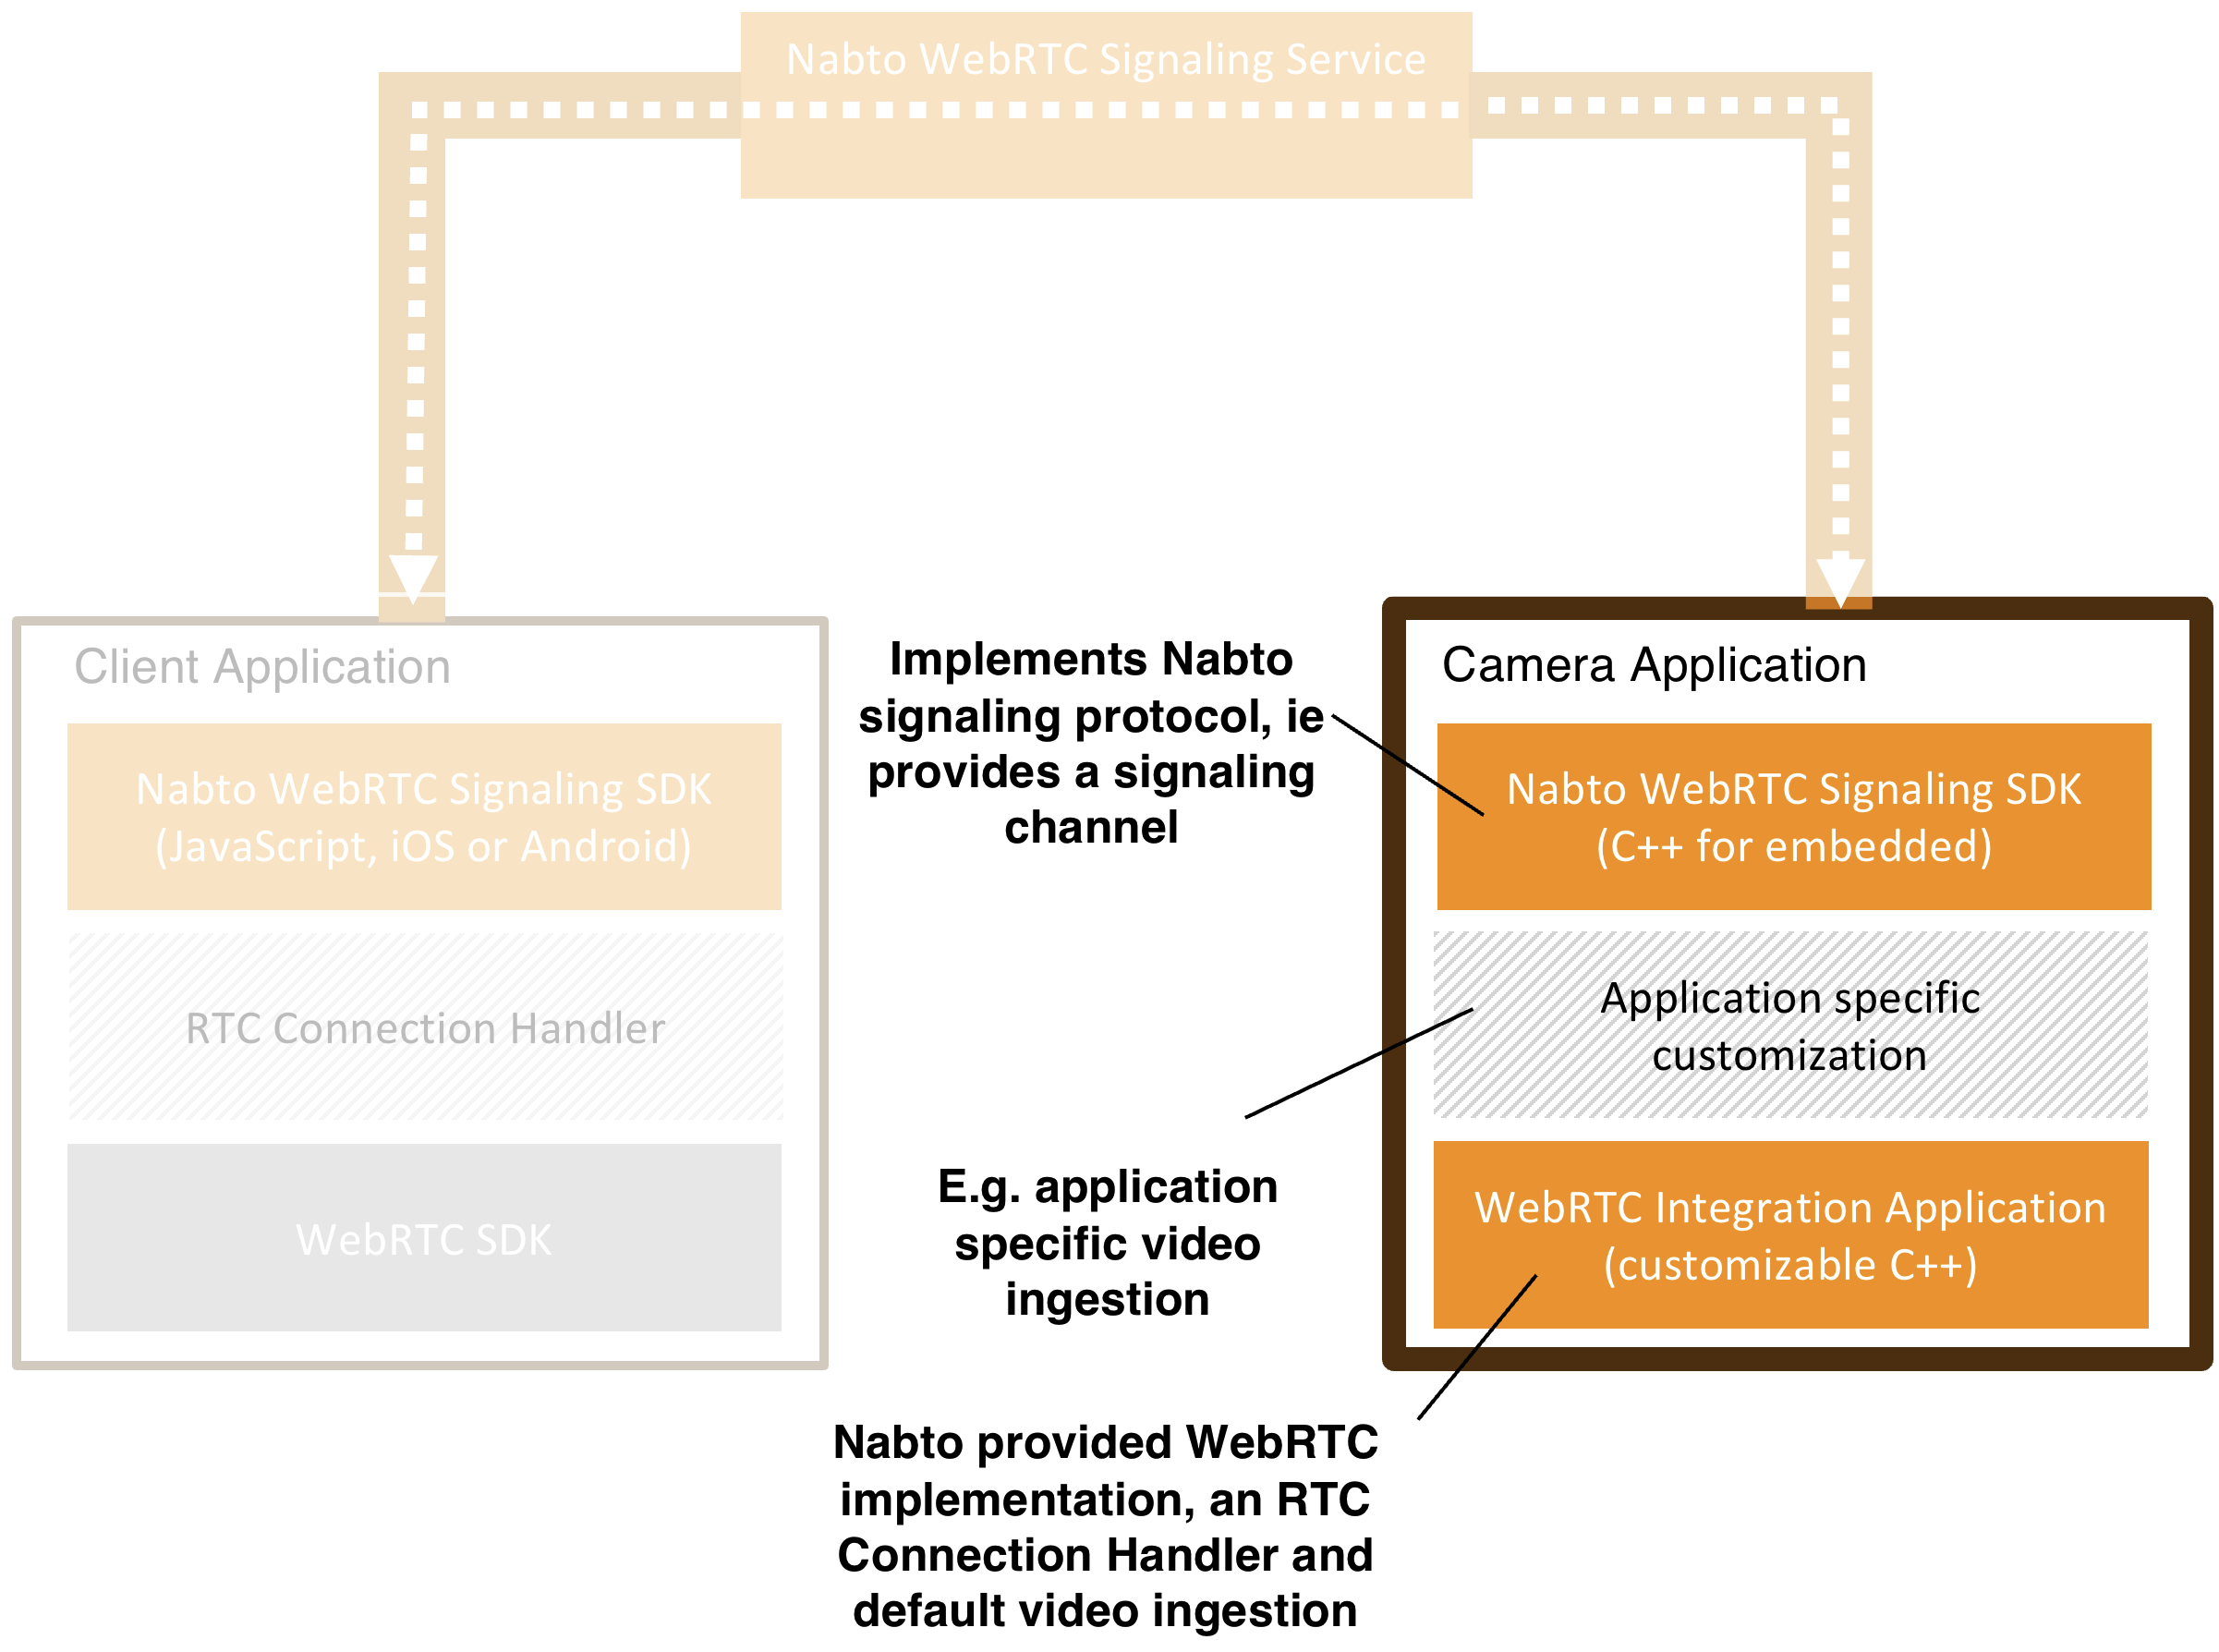
To use Nabto WebRTC, the vendor installs an application on the camera, integrated with the Nabto WebRTC Signaling SDK. The C++ based SDK is designed for this application type. Nabto provides ready-to-use standalone applications as an alternative to integrating the SDK into custom applications.
As part of the manufacturing process, the vendor has installed unique IDs and a cryptographic private key on the camera. This enables the camera to register with the Nabto WebRTC signaling services and clients to open a secure signaling channel.
The vendor application reads the provisioned information from non-volatile memory on the camera and passes it on to the Nabto WebRTC Signaling SDK.
When the camera is connected to the signaling service, a client can open a signaling channel to the camera and use it to establish a WebRTC connection for media streaming.
The remaining sections focus on C++ examples. This is because implementing media streaming on a camera in C++ adds some complexity not present in JavaScript applications.
Connecting
Passing on the information to the SDK to connect to the signaling service looks as follows:
import { createSignalingDevice, DeviceTokenGenerator } from '@nabto/signaling';

const deviceSettings = {
  productId: 'myProductId',                    // obtained through the Nabto Cloud Console
  deviceId: 'myDeviceId',                      // obtained through the Nabto Cloud Console
  privateKey: 'PEM-encoded-private-key'        // generated by you
};

// Initialize the token generator using the device's identity and private key
const tokenGenerator = new DeviceTokenGenerator(
  deviceSettings.productId,
  deviceSettings.deviceId,
  deviceSettings.privateKey
);

// Create the signaling device
const signalingDevice = createSignalingDevice({
  productId: deviceSettings.productId,
  deviceId: deviceSettings.deviceId,
  tokenGenerator: async () => {
    return tokenGenerator.generateToken()
  }
});

signalingDevice.onNewSignalingChannel = (channel, authorized) => {
  handleNewChannel(channel, authorized);
}

// Connect to the signaling service with automatic token generation
signalingDevice.start();
void connect() {
  std::string productId =
      "myProductId"; // obtained through the Nabto Cloud Console
  std::string deviceId =
      "myDeviceId"; // obtained through the Nabto Cloud Console
  std::string privateKey = "PEM-encoded-private-key"; // generated by you

  nabto::webrtc::SignalingTokenGeneratorPtr jwtPtr =
      nabto::webrtc::util::NabtoTokenGenerator::create(productId, deviceId,
                                                       privateKey);

  auto http = nabto::webrtc::util::CurlHttpClient::create();
  auto ws = nabto::example::RtcWebsocketWrapper::create();
  auto tf = nabto::webrtc::util::StdTimerFactory::create();
  auto trackHandler = nabto::example::H264TrackHandler::create(nullptr);

  nabto::webrtc::SignalingDeviceConfig conf = {deviceId, productId, jwtPtr, "", ws, http, tf};

  auto device = nabto::webrtc::SignalingDeviceFactory::create(conf);
  device->addNewChannelListener(
      [device, trackHandler](nabto::webrtc::SignalingChannelPtr channel, bool authorized) {
        handleNewChannel(device, channel, authorized, trackhandler);
      });
  device->start();
}
After creating the Signaling Device, a listener for incoming Signaling Channels is added. When a new channel is available, we call the handleNewChannel() method. How this method handles the channel is described in the following sections.
Finally, the Signaling Device is started.
Securing the Signaling channel
When a client has opened a signaling channel, the device must ensure the client has access to the camera before starting the WebRTC connection (see the security section for details). This can be fully customized, however, Nabto provides Message Transport implementations handling this as well as implementing a suitable network protocol for WebRTC signaling. These Message Transports will start by sending a message to the device to set up the signaling channel and retrieve ICE server configurations.
The Message Transport uses an event-based model. For instance, once the setup phase is complete, a setupdone event is triggered. You can listen for this event using addSetupDoneListener(). When the event is triggered, the transport is ready for exchanging signaling messages.
Using the Shared secret authentication as an example, new channels can be handled like this:
Once the Message Transport is ready (i.e. the setupdone event has fired), it can be used to send and receive signaling messages. The WebrtcConnection example component then takes over and manages the WebRTC Peer Connection.
For JavaScript, where WebRTC comes natively, a lot of details are handled by the browser. This makes the JavaScript example component a fairly standard implementation.
WebRTC Signaling (C++)
When the Message Transport is setup, its returned list of Nabto provided ICE servers can be used to create a WebRTC Peer Connection. In the Nabto provided C++ example, this is handled by the WebrtcConnection component. This integrates the WebRTC library libdatachannel with the signaling to establish the WebRTC connection. Most of this component deals with handling the WebRTC Peer Connection which is outside the scope here. For a general guide to integrate with a WebRTC Peer Connection see this guide.
void WebrtcConnection::init() {
  auto self = shared_from_this();

  messageTransport_->addMessageListener(
      [self](nabto::webrtc::util::WebrtcSignalingMessage &msg) {
        self->handleMessage(msg);
      });

  messageTransport_->addSetupDoneListener(
      [self](const std::vector<nabto::webrtc::IceServer> &iceServers) {
        self->createPeerConnection(iceServers);
        self->addTrack();
      });
}

void WebrtcConnection::addTrack() {
  rtc::Description::Video media("mid-X", rtc::Description::Direction::SendRecv);
  media.addH264Codec(96);
  track_ = pc_->addTrack(media);
  pc_->setLocalDescription();
  startMediaStreaming();
}
When the WebrtcConnection is initialized, it starts listening for messages and the setupdone event from the Message Transport. When this event fires, the Peer Connection is created and the video track is added to it.
To add the track, a video description is created identifying the video feed offered by the camera. Here a H264 feed is used.
Any codec can be specified for the video feed. However, the WebRTC standard requires H264 constrained-baseline to be supported. If you use another codec, you must first ensure that your client platforms support decoding it. This step is very important since for example some browsers may generally support H265, but still not have that support for WebRTC.
After adding the track, the setLocalDescription() call will trigger the device to negotiate the WebRTC connection with the client.
When the track is opened, RTP packets for the video can be sent.
Start Media Stream (C++)
Once the video track has been added to the Peer Connection, the device can start sending video. The WebrtcConnection component allows you to add listeners for RTCP feedback and if needed handle RTP packets from the client in two-way scenarios.
To start streaming, the device must begin reading RTP packets from the camera.
Nabto provides multiple examples for this:
For example, reading RTP packets from a UDP socket can look like this:
void startMediaStreaming() {
  auto self = shared_from_this();
  track_->onMessage([self, track](rtc::message_variant data) {
    auto msg = rtc::make_message(data);
    if (msg->type == rtc::Message::Binary) {
      struct sockaddr_in addr = {};
      addr.sin_family = AF_INET;
      addr.sin_addr.s_addr = inet_addr(self->remoteHost_.c_str());
      addr.sin_port = htons(6001);
      auto ret = sendto(self->rtpSocket_, msg->data(), msg->size(), 0,
                        (struct sockaddr *)&addr, sizeof(addr));
    }
  });
  rtpSocket_ = socket(AF_INET, SOCK_DGRAM, 0);
  struct sockaddr_in addr = {};
  addr.sin_family = AF_INET;
  addr.sin_addr.s_addr = inet_addr("0.0.0.0");
  addr.sin_port = htons(6000);
  bind(rtpSocket_, reinterpret_cast<const sockaddr *>(&addr), sizeof(addr));

  int bufferSize = 212992;
  setsockopt(rtpSocket_, SOL_SOCKET, SO_RCVBUF,
             reinterpret_cast<const char *>(&bufferSize), sizeof(bufferSize));
  rtpThread_ = std::thread(rtpSocketRunner, this);
}

void rtpSocketRunner(RtpClient *self) {
  char packet[2048];
  int len;
  struct sockaddr_in srcAddr;
  socklen_t srcAddrLen = sizeof(srcAddr);
  while (true) {
    len = recvfrom(self->rtpSocket_, packet, 2048, 0,
                   (struct sockaddr *)&srcAddr, &srcAddrLen);

    if (len < 0) {
      break;
    }
    if (track_->isOpen()) {
      track->send(packet, length);
    }
  }
}
The packets are fed into the WebRTC connection as they arrive. The connection handles congestion control, retransmissions and timing to ensure smooth playback on the client side.